I wasn’t able to attend B&B last year – what a bummer. This year though I’ll be going for a couple of days with lots of friends. Since we are all enrolled in different classes it should be interesting to see what everyone creates. I’m signed up for a pewter casting class and a Photoshop class. I wanted the photography class but it was full – drats!
Since I already cast in silver and I think it will be an excellent transition class to iron out any kinks between the two. Silver is expensive. Gone are the days of major casting pours and it’s difficult for customers to be able to afford to purchase a batch of custom silver designs. Who can afford to load up a necklace or bracelet with it? It’s a lot like a builder building a spec house these days, the market isn’t there. Brass, bronze, and shibushi, are an option I will be exploring sooner or later but for now I think pewter might be a very viable alternative.
I’m excited about the prospects. How has the rise in metals affected your choices? What kind of class would you enjoy taking?

Wednesday, February 29, 2012
Tuesday, February 28, 2012
While the Soup is Simmering...
 While the soup for the Bead Soup Blog Hop is still simmering I've been working on some new clay pieces.
 I saw a cover shot on a recent magazine of a half flower clay piece and decided to make one for myself. Flowers are always fun and a half of a sun or flower is a great visual to play with. Certainly mine isn't much like the original artist - everyone has different skills but it was fun to try one.
Now the Raven pendant - that's all my style. Gosh they are powerful looking birds. I'm pretty happy with the sculpting on this one.
I've been working on several talisman type objects and thought I'd try some spirit beads too. In this photo (and an awful one I might add) I pulled out the red clay I've been reconstituting and made one that will rattle when it's shaken. It would be nice on a long necklace.
Fun stuff, don't you think? I'm not quite sure about the glaze for the Raven. This is still where my inexperience with that aspect is holding me back. Maybe I'll do some test tiles before I ruin a very nice piece. I suppose I could do a mold of it first - too many decisions when all I really want to do is play in the mud.
Sunday, February 26, 2012
Ready, Set, Plop!

I was ready, and then I asked my husband what he thought of the necklace I'm working on. He said, "which part?" When will I learn - and for that fact - when will he! When I want a critique I ask my girlfriends. When I want support ( more like a rubber stamp, for example, "You look great.") I ask my husband. What was I thinking? I knew he'd ask something like that. ACK!
He's a trend setter alright. Yup! He has fifteen T-shirts he can match to his pj bottoms and jeans. What would this man know about recycled sari silk, Irish linen, and that when I say, "How's it hanging?" I'm referring to balance of the necklace I'm working on and not......well, you know.
Saturday, February 25, 2012
Soup's Cooking

It’s the big count down for Bead Soup Blog Hop – One week to go – I’m working like mad on my pieces. Since I don’t do much finished work anymore it’s been a challenge to put my ducks in a row. So what can you expect me to put with Rebecca’s great soup she sent me?
The photo is of waxed linen I used in addition to my bead soup stash…..if you want to know what I did with it you will have to tune in to this blog next Saturday, March 3rd for the big Blog Hop. It’s going to include some awesome eye candy.
Starting on next Saturday I’m going to make it a Bead Soup Week. After the initial hop post I’m going to spend the rest of week talking tutorials, close-ups, design reasoning behind the necklace I created, new internet resources, and some of my blog hop favorites. It’s going to be a whopper of a week to start off March!
Friday, February 24, 2012
Barb Lewis is Having an E Course Giveaway
I'm posting this right from Barb's blog:
Wednesday, February 22, 2012
eCourse Introduction: Studio Walkthrough
"Over the past year, I've received requests to teach Painting with Fire Workshops from so many nice people across the country. I wish I could have accepted them all because I love to teach AND have a serious case of wanderlust! So, I did the next best thing! I've created a ning group for an Online Painting with Fire Workshop where you can view the videos when you want and how often you want! You say you live in Latvia? No problem! Ah, the beauty of the internet! "
You see Barb is giving away one free e-course and you just have to go to her blog and sign up!
Incredible, HUH
Well hurry along and sign up and be sure to go to that video of her new studio - it's to die for!
Click Below-
Thursday, February 23, 2012
I Love Me Some Words


Sorry for the absense! I've been busy photographing and reworking some of my Bead Soup pieces. Just a little to much on my plate right now.
Tuesday, February 21, 2012

Sunday, February 19, 2012
What a Wonderful Day

We spent today doing something that we've done once a year for thirty years now - relaxing on our anniversary. Thirty Years! On the very first one we went to the movie. I didn't feel very well that day - oh, ecstatic at marrying the man I love but physically not well. As I've said - small town and not huge options for entertainment. We did dinner and a movie. We have a wonderful theatre with one screen...and what was playing. Halloween. What a way to celebrate such an auspicious occasion, LOL. We loved it.
Tomorrow - back to art!
Saturday, February 18, 2012
Here's the Rejects Jean
I told Jean Wells I’d do a post of the flub ups I mentioned in the last post. I’ve included a kiln photo in the batch at the top. It wasn’t the placement of the pieces – it was the choice and application of the glazes. I know what I did wrong, at least I THINK I know.

The huge round hollow bead of green (uh, supposed to be Dragonfly Green). I layered the colors – several – but mostly the Dragonfly. It was stippled with a darker color (Espresso), which doesn’t show up anywhere. I thought I had it thick with glaze – uh, could have been a whole lot thicker. This is the bead I’m going to torture either by sandblasting, etching, or re-glazing. It’s out of round – not a huge deal to me compared to glaze debacle.
Here’s a yuck – what happened to the hearts in the two pendants? Problem – too much underglazing of the hearts. So, when they were glazed with clear they ran and blurred. They’ll become experiments to see how etch will look – especially if I block out some of the areas before I etch.

This was the large cone bail in the kiln. Problem – the glaze (Autumn Mist) should have run. It was another one of those that was duel coated with another glaze (Espresso again). It didn’t run – it kind of crawled here and there. Solution – should have used the Autumn Mist with out anything else and hung like a bell, not on its side. Another solution – I made netting for the huge bail and a cap. I hammered a copper bead cap into a domed copper ring. It all needs to be heavily antiqued and assembled. And how am I going to use it. I haven’t a clue. Any ideas?
Word pendants and disc – sloppiness does not become me. Problem here – Trying to block in an area with glaze and paint central portion with a clear glaze. I’m guessing it was just all on too thick and ran together in a rather unsightly pattern. Solution – stick to underglazes on these pieces. If I want a matt look – purchase a matt clear glaze for the final application

There were successes in that kiln load…plenty of them. And, by the way, if you guys see something you are interested in let me know. I don’t list everything on Etsy – it costs too much but I won’t run the kiln half empty so I have piles of goodies here.


This is a piece I consider a success. It was the Autumn Mist glaze used alone and hung down in the kiln. It was designed with the African series in mind and for a twig wrap at the top – maybe a thin willow branch. I left holes along the edge to accommodate the wrapping with waxed linen and a hole at the bottom to make something dangly that includes that disc (ah, an espresso + something else I can’t remember that turned out – LOL). I’ll be making more of these small clay spirit cases. I was thinking too they might be good as wish boxes. Make them hollow except a small slot on the top to put your paper wishes into and something to hang them from. HHmmmmm…now I’m thinking about Spirit boxes…..stop me!
Friday, February 17, 2012
No, not Snow!

Today's kiln was a bit of a surprise. Some good and some totally yucky. I had purchased some new glazes and couldn't wait to see how they worked. This is where my inexperience with clay really sucks! Things I wanted to run didn't - things I didn't think would drip - well, you get the idea. I layered different glazes - looks good on pots, right? On beads - not so good.
It's not the glazes fault - (I could use a blinkie here)- USER ERROR! On, the bright side, most of the kiln load turned out and the pieces that aren't exactly my favorites were a learning experience. Besides, they're now subject to torture.
Torture you say? Absolutely. I can now etch them - see what sandblasting does to them and who knows what else can be conjured up. Any ideas?
Of the beads that turned out I thought I'd post this set I made for a friend. It's a collaboration and she requested the color and theme (Snowflakes). If I didn't love her to pieces I'd scream.
Tuesday, February 14, 2012
Who's your Valentine - Baby?
 The Munsters
 Dracula and Mina
  The Frankensteins

Bettlejuice and Lydia
Everyone has one! And, if this year you don't, who would you choose?
Monday, February 13, 2012
Garage Sale

It’s too early for Garage Sale in the driveway but it’s not to early for one in Etsy. Thank You everyone for all of your continual support here on the blog and with my art – I’m often overwhelmed by your kindness.
All customers can use the coupon code “Christmas” to purchase any of the Christmas Holiday Inspired bead sets (they are all listed in the shop under the Holiday Section in my shop) at 10% off the listed prices!
Get ready ahead of time – It’s better than Christmas in July! There is no change in shipping here yet so take advantage before the post office gets crazy on us with their new rate hikes.
Sunday, February 12, 2012
Things that make me go...hmmmm?

It’s an interesting conundrum (for me) as to why lampwork beads sell but ceramic beads seem to sit around just a little longer on the Internet shelf. Not that they sit around for long but there does seem to be a difference.
As far as ease of work it’s a toss up. You can use presses/moulds to make your lampwork and the same for ceramics. So if you are working at making production pieces either (IMHO) takes an equal amount of time. If you are hand making either of them, stamping letters on ceramics, hand forming the beads, and making holes –or – forming the lampwork piece, making sure those edge holes look good, surface design work, and so on, they also seem to both take a fairly equal amount of time.
In fact, the clay might actually take a little more time if you are hand painting them – clay doesn’t generally come pre-colored, as glass does. If you aren’t using the color of the clay as a design element then under glazing takes many coats topped with a clear glaze coat. Actually, several if they aren’t dipped. That means clay beads that are fanciful take longer to make than lampwork, yet seem to command less in pricing.
Now you see the problem….right? I’ve checked the best of some of the Etsy sites too. It appears this might be so (not for all – just the norm) and I wonder if there could be a misinterpretation of the medium. If there is, then that is too bad because both are great to work with – look fantastic on jewelry – and take, for the most part, and equal amount of time and expertise to create.
I’ll keep making them both and will charge accordingly. What have you noticed in pricing trends for various mediums? Other than the ridiculous cost of metals - - - which is still in the “yikes” category.
Saturday, February 11, 2012
Inspiration Fired
I've shown you the painted bique beads and here are the photos I used as inspiration for this particular set. The clay was insised with a tool. Black underlgaze was rubbed into the cracks and colorful overglaze painted on the geometrics. It's not a color scheme for the faint of heart. But, worn under a crisp white shirt or on top of white T-Shirt you are bound to have an impact.
 African Wedding Ceremony Refinery
 African Wedding Ceremony Refinery
 Kenyan - Masai

I have a few books - like Africa Adorned. This book is new and looks like a great reference piece.

This is the beginning of a collection of colorful beads based on the incredible beaded pieces above. It's kind of glare ridden photograph but you will be able to see what the glazed beads looked like after they were fired.

I hope you enjoyed this clay week. It was a short one. There are so many types of clay now just in ceramics. And that doesn't even cover polymers, resins, metal clays, and so on. I wish I could have showed you more kinds but it's wise to go with what you know. After I'm done with this series I'm thinking of going a little more primative and neutral.
Thursday, February 9, 2012
Painting Your Bisque
 Bique fired clay that I've painted in underglazes and glazes.
Below is an excert from About.com and has much more information on it than I can possibly tell you about decorating and painting your clay so I've given you the "tease" and the link. Enjoy.
"After firing, greenware is called bisque. The bisque is finished with underglaze for bisque, glazes or non-fired paints. Here we will only concentrate on the fired glazes and underglazes.
Before you begin painting always be sure to wipe your ceramic piece down with a damp sponge. This will ensure that there is no dust on your piece which could cause the glaze to pull away and leave a bare spot. It will also help prepare the bisque to accept the glaze. A dry piece of bisque could instantly absorb all the moisture in the glaze, causing your brush to grab. Glaze and underglaze should flow smoothly from the brush.
Underglaze for bisque is generally used for detail painting, though it can be used to cover the entire piece if you so desire. This is where you would use Duncan's Concepts for Bisque. Use an appropriate sized brush, not too small. For long flowing lines, use a liner, loading it carefully so the paint flows freely from the bristles.
After painting your detail on the piece you should use a sponge or lightly brush on the first coat of clear glaze. Allow this first coat to dry, then paint on two more coats, being careful not to smear your detail paint. Or you can dip the piece in a clear dipping glaze."

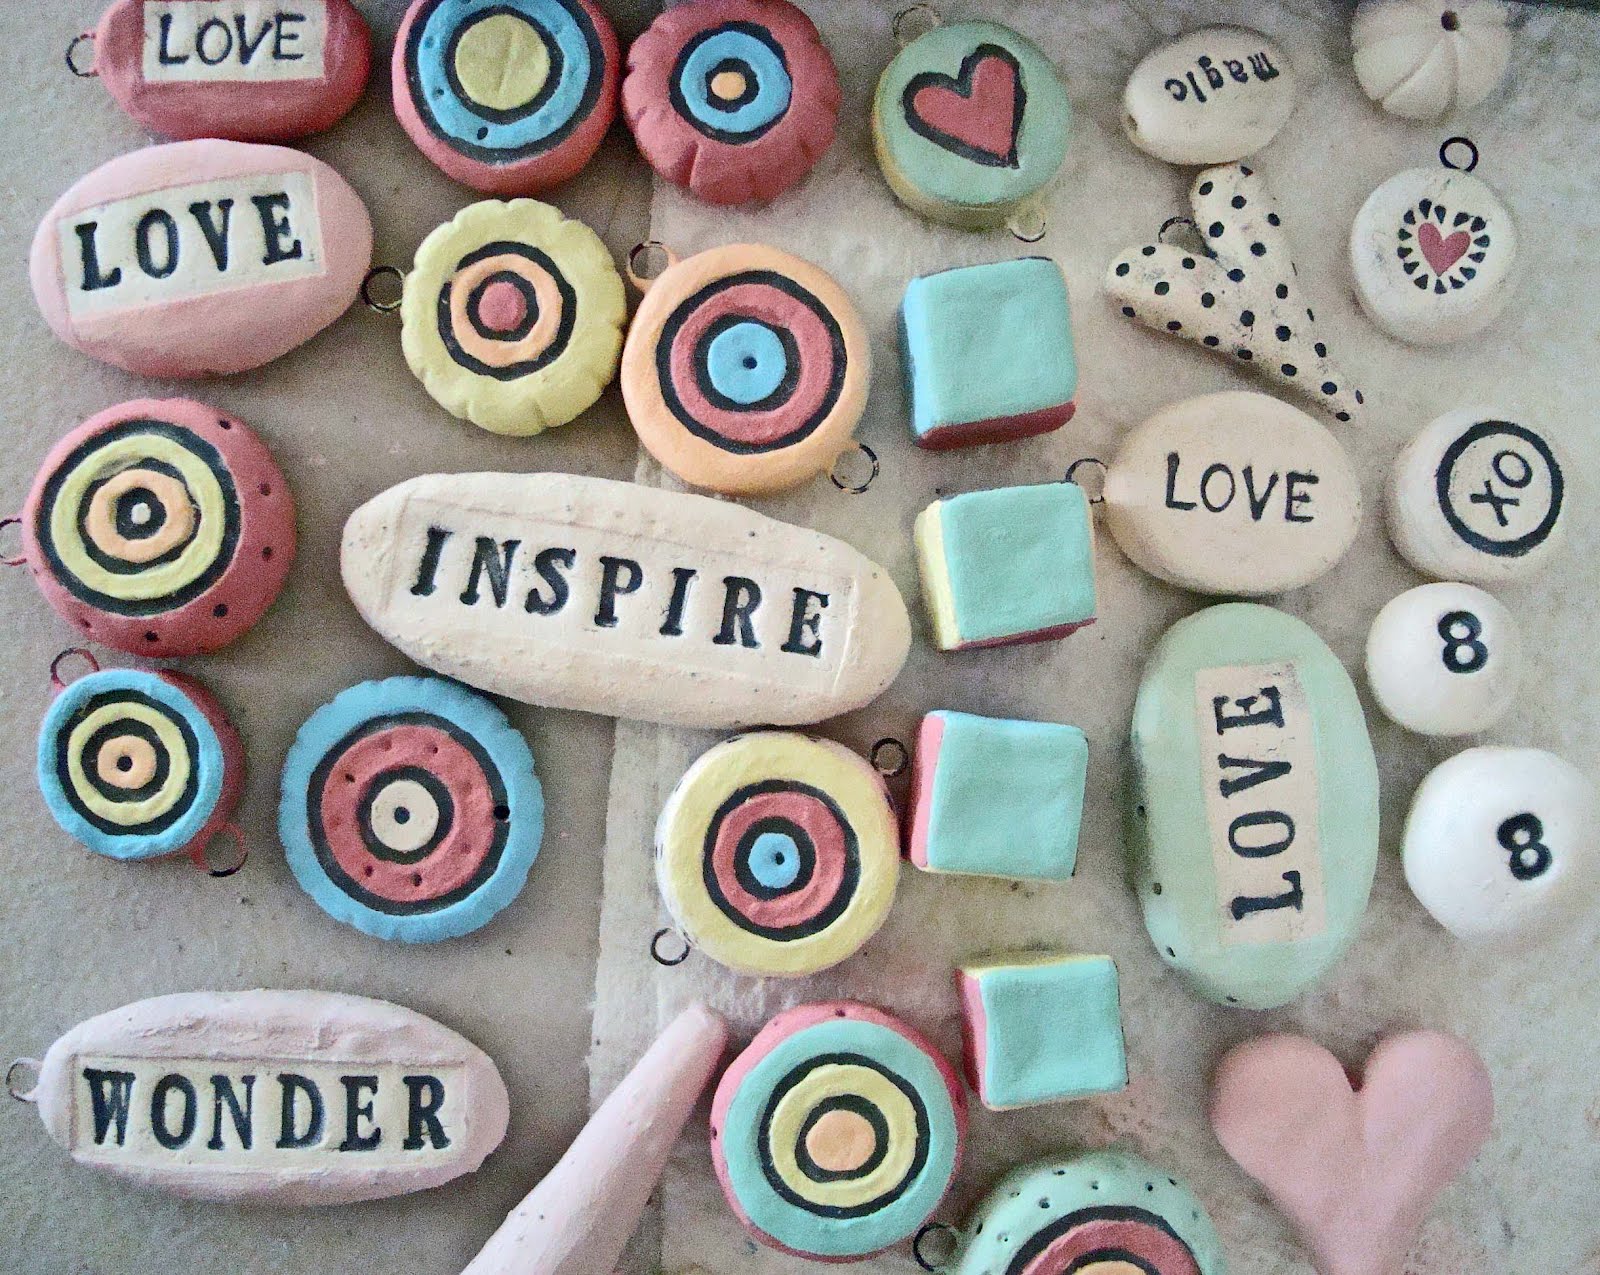
Here is my tiny kiln full of gleaming treasures.
Wednesday, February 8, 2012
Hmmmmm...Soup
Soup’s on….
Taking a break from the clay posts to show you what my bead soup partner Rebecca Sirevaag sent me. She is a great colorist and I’d of never thought of this combination. My mind is running wild with ideas for different pieces to create. Look at that great leaf print she made on the copper. It will be the basis of my decision. It’s definitely a challenge because I can see so many directions and I haven’t made a necklace in a long time.
I would never of thought of this color grouping so I'm excited to work with it. I have some lampwork and ceramic planned to go with it and when those are complete I sure hope it will translate as well as it has in my head and on paper.

This is the hand stamped copper leaf that Rebecca sent. She says she loves making these and it shows.Look at the intricate detail on that leaf. This is the bead soup I have sent Rebecca. I made a grouping of six beads, including a focal and hit up my stash for go with beads, chains, and I made a silver clasp.

Tuesday, February 7, 2012
Plaster Molds for Production
I have talked about molds for clay and if you’re my generation you remember the big craze of “ceramic stores”. They are kind of like the paint your own ceramic stores that are around now. But then, you would pick out the poured “greenware”, clean it up, and take it back to be fired – pick it up and bring it home to paint it up using either glaze or paint. They have streamlined things a whole lot with those stores. I remember pouring some of those molds and I have, can you believe it (LOL), a Lark book called The Clay Lover’s Guide to Making Molds by Peirce Clayton.

I decided to make some plaster molds and see how they worked. There are plenty of instructions out there but it’s not particularly hard. This is what I did (simplified) but there are many other ways.
1. Find an object you‘d like to have duplicates of, making sure there are not any under cuts in what you want. For example you’ll see in the photo I used some buttons.
2. Lightly coat the object with liquid beeswax or oil soap– embed the object in clay (it will be a temporary base) so there are not any under cuts.
3. Make a dam (my slit plastic containers) so you have something to pour the plaster into – around the object and pushed into the clay base.
4. Mix your plaster and use a paint brush/ or finger to cover your object and then pour the rest into your container.
5. Let it set up. It doesn’t take long. Remove the plastic container and the clay base (you can reuse that for other bases but not in the mold (plaster is a bad thing to have mixed into a clay piece you are about to dry and fire).
6. Remove the object from the plaster when it dries. Mostly it just pops out pretty good – but it’s a learning process. Let your new mold dry for at least 24 hours before you use it. It needs to dry thoroughly.
In the photos I’ve included you can see the buttons, molds, and some finished clay pieces ready to fire. I know this isn't a step by step instruction but I don't think you need one on such a simple process as a one sided mold.
To make a clay piece in the mold you press your clay into the cavity and let it dry a bit before you pull it out. Like the greenware of the past you will have to clean your edges. Where you see beads in the photo I have attached two pressed clay sides together and then made a hole in the bead.
Onward and Upward….
Monday, February 6, 2012
Learning About Clay


Clay – I’ve said before I have a basic knowledge. I worked with clay in college but it wasn’t my preferred medium. Fact is I was forced into a class by my teachers. They wanted me to break out of the printmaking and painting mode and into something more three dimensional. LOL I hated having my hands dirty and nearly flunked the class. I was rescued by fellow students who made pots for me and scratched my name on the bottoms of them.
I dabbled a bit when my daughter took up wheel thrown pottery as a hobby. My husband took a few classes with her and it was “their thing”. We’ve always had a wealth of clay books around the house. The photo shows my favorites. There are more on the shelves.
Then after I took a class three years ago from Jennifer Heynen that it began to come together. I’d highly recommend taking a local pottery class and reading. There are forums, organizations, Etsy eye candy, and plenty of on-line stores with books and supplies.
This is my list but there are many more:
Forums:
Ceramics Art Daily
Clay Station
Crafts Forum UK
Wet Canvas
Wealth of Information:I dabbled a bit when my daughter took up wheel thrown pottery as a hobby. My husband took a few classes with her and it was “their thing”. We’ve always had a wealth of clay books around the house. The photo shows my favorites. There are more on the shelves.
Then after I took a class three years ago from Jennifer Heynen that it began to come together. I’d highly recommend taking a local pottery class and reading. There are forums, organizations, Etsy eye candy, and plenty of on-line stores with books and supplies.
This is my list but there are many more:
Forums:
Ceramics Art Daily
Clay Station
Crafts Forum UK
Wet Canvas
Ceramics Art Daily
Ceramics Today
Sunday, February 5, 2012
It's Silly Sunday of Clay Week!
Welcome to a week of clay posts while I'm working on lampwork. Makes sense, right? Actually I made the posts while I was working on clay last week so I could show you all the new things I've learned while I work on lampwork to go with the new clay pieces.
I thought I'd start this dialogue with definitions of what each process is. That way if something I'm posting doesn't make sense you can always go back to the list. Like every medium ceramic clay has it's own "lingo". Feel free to copy the list - there's more but I tried to shorten it to cover what I might talk about.
It is "Silly Sunday" so enjoy the joke. Forget the list until next week when it sounds like I'm talking through my fanny trying to explain a technique. I'll try not to be complicated. Have a great and happy day!

BISQUE - Unglazed clay, fired once at a low temperature.
BISQUE FIRING - The process of firing unglazed clay to a low temperature to harden the clay and drive the physical water from it. The approximate temperature of this firing is 1815 F.
BONE DRY - Refers to clay which is ready to be fired. All the moisture is gone from the clay. Clay is VERY FRAGILE at this stage.
CERAMICS - The art of making things of clay. Clay is an ancient tradition.
CLAY – A decomposed granite-type rock. To be classified as clay the decomposed rock must have fine particles so that it will be plastic (see definition below). Clays contain impurities which affect color and firing temperatures.
FIRE - To bake in a kiln. Firing is a term used for “cooking” the clay.
FORM - Three-dimensional shape and structure of an object.
GLAZE - A glassy coating that has been melted onto a ceramic surface. It is used to decorate the piece and to seal the clay surfaces.
GLAZE FIRE - Much hotter than a bisque fire. Firing to temperature at which glaze melts to form a glass like surface. GLAZE FIRING - Typically the second firing of a piece pottery which has been coated with glass forming materials. The approximate temperature of this firing 2300.
GLOSS - A shiny surface.
GREENWARE - Unfired pottery that is bone-dry, a state in which clay forms are the most fragile.
HANDBUILDING - One of the oldest craft techniques in which objects are constructed entirely by hand.
INCISING - Indenting a line into a flat surface.
KILN - Enclosed containers of various sizes- built of refractory brick and heated by electricity, gas, oil, or wood to temperatures from 1500 F. to 2340 F. in which ceramic ware is fired. Also called the “oven” for firing the clay.
LEATHER HARD - Refers to clay that is dry enough but still damp enough to be joined to other pieces or carved without distortion. Clay at this state resembles leather. Hard to bend and soft enough to be carved.
MATTE - Not shiny.
PLASTICITY - Quality of clay that allows it to be manipulated and still maintain its shape without cracking or sagging.
PRESS MOLD - A form which clay is compressed into, resulting in a repeatable shape or texture. These are usually made of plaster. We used plastic bowls lined with cheesecloth as press molds.
SCORING – Roughing up of the surface of clay for joining.
SLAB - Clay which has been made flat by rolling.
SLAB CONSTRUCTION - Handbuilding technique in which flat pieces of clay are joined (clay is flattened and thinned with rolling pin or slab roller)
SLIP – A liquid form of clay used as a glue or as decoration.
SLUMP MOLD - A form which is used to support wet clay in the early stages of construction. They are typically made of plaster. We used canvas covered Styrofoam shapes as slump molds.
STONEWARE – A type of clay which is usually grey in color. It is good for handbuilding and throwing because of its high plasticity.
UNDERGLAZE - Colored decoration applied to bisqued clay, then coated with a clear glaze. Typically made of clay slip and raw pigment
Saturday, February 4, 2012
Book Giveaway Winner
I’m packing up another book today!
Drum roll please…
Drum roll please…

Try as I would to get that Random generator attached to this blog and stuck on the first number it generated I couldn't do it. Makes me nuts when I can't get something that should be simple to work. Regardless, Robin Johnston was the first number to come up - number 4 (the fourth post in the giveaway).
Congratulations Robin Johnston
Please get in touch with me via either a PM in Lampwork, Etc. (delinquent beader) or through my regular email sdriscoll @ charter.net (omit the spaces) and I’ll whisk your package to you.
Stay tuned to the blog. Next week is “Clay Week” and we’ll find some fun things to talk about. This will be about ceramic clay since it’s what I’m working with along with lampwork. I’m a certified instructor for PMC (thank you Barbara Simon Becker and Rio) but I haven’t practiced in years. Polymer clay is wonderful medium but I have zero experience so I’ll just go with what I know. See you next week…
Friday, February 3, 2012
What a Pickle!

Just thought I'd share this great tip incase you havent' used it. For years I purchased Sparex or Rio Pickle - it's great stuff but why pay the shipping and packaging when you can "go local" with your purchase. Costs less and works better!
Don't buy commercial pickle. Go to your local hardware or pool supply instead and get the powder used to drop the pH in pool water. It's usually marketed as "pH Minus" or something similar. Read the label, make sure it is sodium bisulfate (not sodium bisulfite, they're two different chemicals). I love this one!
or...
You can also choose to use citric acid pickle instead. Buy it in powder form in your local health food store and dissolve about one 4oz container in a quart of water. Use as normal, best results when heated. This pickle is more environmentally friendly than other pickle solutions, but you will need to allow a few minutes more for it to do its work...perhaps 25% longer in the solution for the same results.
Thursday, February 2, 2012

Subscribe to:
Posts (Atom)