Friday, August 23, 2013

Cabbing

I've been on kind of mission lately...my friend and cohort Susan Lambert having been discussing getting a new round of classes going again.  We've always enjoyed teaching in tandem and we've designed several classes we taught at Beadfest.  Fun stuff - teaching. 

To that end we are both working on glass cabs that we are going to set.  I love making cabs - well, what the heck - I like glass and metal so it's a natural.


So far these are the cabs I've come up with - more are in the works.  These are made off-mandrel so they can be a variety of sizes.  Not a problem when you can set them or put a glass bail on the top when you make them.  Either works great and looks great.  Most of these are medium sized - I didn't want to go to big since my intention is to add silver but I ought to make some large ones too.  They aren't exactly sitting straight yet since I like to punty a rod to the front and replace the steel chop stick I use on the back with a small glass rod I nip off later after I replace glass on the back taken away by the chop.  It's a process and sounds worse than it is.  I like to touch the back to a flat lap machine anyway so this works best for me.

There are lots of different ways to make cabs.  Off mandrel, on a cab mandrel (Zoozi's carries the old Inspiration ones that are wonderful to work on), and also you can work them on the end of a mandrel coated in mandrel release.  I'm sure there are tons of other ways.  I have some brass tools that are for ring tops but I've never tried them yet. 

Tomorrow I hope to head to the studio and do a few more.  I'd like to have a large selection to choose from before I start setting any and the rest will go on Etsy.   Uh, where to find a place to teach in that can handle both glass and metal - well, that might be an issue.

Onward and upward...

Friday, August 16, 2013

Back to the Torch

New focal bead - based on a pattern I saw by Dawn on LE.  This is a large focal bead and I'm not sure how I managed it in the flame for nearly two hours but did....and on a short mandrel.  Next time I use one of the long ones.  The ochre color doesn't play well with everything so I added turquoise dots and then encased the entire bead in clear so whatever I added to the top wouldn't bleed into it.  Look at how the ochre dots on the red made little halo images.  Interesting.  Glass chemistry is so much fun.

Thursday, August 8, 2013

Still at work on the polymer problem - But, Snippets have arrived..

I told everyone that I was working on a line of 'Snippets" They would be smaller than the found object earrings....which I have always felt needed to look as if they carried with them an important story.  Maybe someone's story about their life, or another's vacation well spent, or of a summer love lost.  They just need to have some heft to hold the story...and be worn by a woman capable of a superb life of her own.  So here I have to show you some earrings that will be posted in MetalWerks for purchase within a day or two.

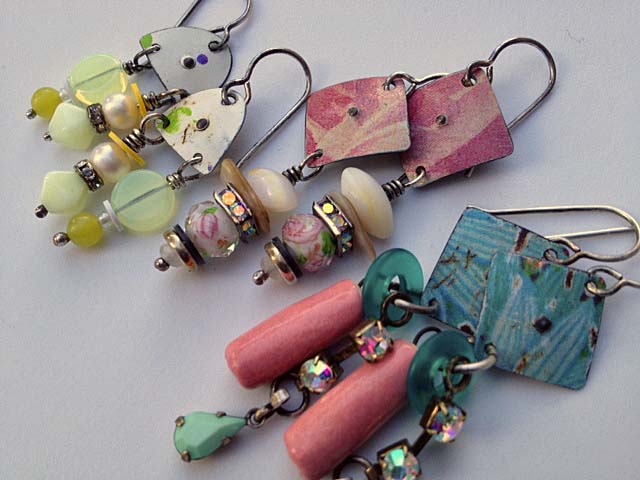
"Snippets" - My style of earring completed with a snippet of tin and complimentary components culled from around the world.  Just in these earrings there are, brass, vinyl record discs from Africa, Czech glass rounds, faceted murrini roses, shell, mother of pearl, pearls, handmade ceramic dangles, and silver to play off of the non-precious but antique tin. 

There is a photo of a couple of sets of "snippets".  I work in a way that maybe a colorist would find the most comforting.  A decision was made at the beginning to take a tin - scope out what may be an innocuous area in the design - but something that portrayed a nice texture, color, but nothing really discernible.  It had to be little more than a snippet - a tiny piece.  And the tiny piece had to be showing some wear...we people get bumps and scrapes in our lives so let's save shining and perfect for the babies of the world.   Decision number 1.   From there a color palette had to be created around the color of this tin and of whatever bead, wire, fiber, antique hoard I happen to have around.  It's not tough on this account as I have a large collection.  Decision 2 - no major shopping for beads - it had to come out of the hoard - to be released into the world.  These cabinet drawers contained beads that need to have an escape plan and a way of having their 15 minutes of fame.

It's not that "Snippets" don't have stories but I think of them at the beginning of their lives....cute, small, light in weight to cover the dog days of summer into the fall -  more interesting when the tinniest treasures are added to a dangle.  And, with enough of a mix (and the, all important tin) - that the wearer may begin to explain her new earrings in a story of her own, "These are my earrings and they are sooo cool, this is recycled tin, and this bead here is handmade glass - this one comes from the Czech Republic - and this one is an antique."   I want for each customer to have some great times wearing them so their mystique will grow as they are graciously worn throughout the years.

There are other active decisions - wear ability.  Lightly oxidized, patinas, sterling silver for earring wires - keep it simple for the Snippets and let the color and the choice of pieces do the talking.  How wonderful there are beads with iridized coatings and plenty of flash in a little trim of crystals here and there. 
I just think these are so romantic.  They are on the heavy side but not ear ripping heavy.  Ever since my article on earring weights I do quite a bit of switching components in and out to try and get the weight into the "reasonable to wear' state.

These are the first ones I've gotten photos of.  There are three snippets and then a full blown out Story Teller from that collection of earrings.  The token at the bottom of the earring is old, it is from the Honolulu Transit Authority.  It kind of dictated where this earring was going to end....even the color I and pattern I chose for in the tin.  I wanted it to be old - floral - feminine in nature.  It also had to have old fashioned piece on it - such as the dipped facets with the mustard yellow, the amethyst points (faded but still powerful).  The repurposed rhinestone - an area gone by, maybe? A dance on the beach where all she wore were those shimmering stones.  (oh - ooops, maybe a fantasy of mine from a long time ago....LOL).

Well, these will be posted soon - more and better photos will need to be taken and copy written.  I've another half a dozen pairs of various sizes sitting around waiting for their "magical moment" when I dig down into a drawer and find just the right beads to finish the job.  I know I will.

Woot woot - I love making jewelry.

Monday, August 5, 2013

Epic Failure

Oh for Pete's sake!  I just did some Fimo in the toaster oven to make the Hugs and Kisses stamps that I use on the back of my glass heart beads.  They worked perfectly so I guess I got cocky and thought I'd try some other bits and pieces.  I noticed that the temp recommendations were different on the Sculpty than the Fimo but I thought, Well, what the heck.  I'll go slow and find a temp that's in the middle - I mean it's only like ten degrees - right? 

Well, I don't know what the heck happened.  I ran the toaster for fifteen minutes - thinking it's run it a second time for the second fifteen.  Uh, colossal failure.   Look at what I found after the first run.  OMG - what happened? 

Any of you polymer people have any ideas?  It even bubbled.....whoa.

Saturday, August 3, 2013

I've got a frickin' hole in my head, er - paddle.

Yes, you guys are right - and thanks so much for the comments.  I've always been a firm believer in the right tool for the right job.  You really can't make these paddles without all of that wood working equipment.  And, yup, it's like anything...if you have the experience in the craft then you can make the difficult easier.  And working with woods for over 30 years qualifies as that for sure.  Let alone a studio full of woodworking equipment.

Sometimes I see teachers who try to instruct their students with shoddy equipment and it makes me crazy.  If they're new to whatever the craft is you can just see the frustration written all over their faces.  Basically, they're not only fighting to learn the process but they're fighting the equipment right along with it.   It's an insanity.  One class I used to attend for fun I watched a very decent metalsmithing teacher telling her students how easy it was to solder with a plumbers torch.  Uh, sure - maybe for an experienced artist who solders a lot it might be.  And certainly it wouldn't be used for a delicate seam or something with multiple soldering jobs but the poor students were trying to do just that and they were ready to give up on making jewelry.  Not fair.  If she'd of just explained the limitations of working with that type of torch - or maybe added a butane or duel fuel torch so they could see and try the difference but she wasn't about to do that.  Like I said - an insanity - - - - almost like withholding information so you can cripple your possible competition.  So not nice.

I digress - sorry about the tangent. 

Here's the next steps on the Viking Knit paddles...holes, holes, holes.  LOL.  As you can see from the photos there are eight of them and each hole is new set up with the press...not hard, more like time consuming.  After this I will side sand the paddles (you turn the band saw into a tall sander by replacing the blade with a 1"X 80" sanding belt).  After that - rout them and flat sand them - then change the drill press into a flap sander so you can go around what was routed in the grip and make sure it's "soft" edged for the handle.


"I follow you out to the studio and then I wait - can we go yet, can we go yet?  Hello....."

Yeah, I know lots of steps but so worth the process.  Thanks Maple Girl (Andrea) - I'm glad you like yours.  So many teachers use them - Diane Cook at Art Unraveled and Diana Frey.  Robin Koza down in Indiana - and Cahootz (who sells great Viking Knit caps).  I'm grateful so many artists like them too.