Tuesday, December 31, 2013

December was so busy!


I’m just not sure where all the time has flown this month.  It’s just plain craziness when things aren’t getting posted.  Maybe I can catch you up to date – the short versions.
Daisy (cutest 5 month old retriever in the world) dashed after a cat and knocked me down five steps.  Plop!  Hit my head on the cement and broke my ankle.  Luckily there are two bones in there and I only l took out one, and not the load bearing one. 

I’ve been working away on some pieces.   I have to set the stones.  Actually I have stones to set on many since it seems like I’m at that point on several pieces.
In the middle of soldering a new piece I had about the most freaky incident happen.  My mini Smith torch blew a hose.  It cracked immediately under the hand piece while I was trying to solder down a bezel.  So I got this backwash of flame in my hand that shot out so fast it blew the torch out of my hand.  Luckily nothing was hurt and I could grab the torch and turn off the gas.   My hand is okay now – it wasn’t at first but Silvadine cream for burns and an ice pack overnight got me back to normal.  A new hose is ordered and all is well.

Christmas has come and gone – ours was nice and  hope yours was too.  My daughter is pregnant with a baby boy and she and her hubby are just beaming brightly.  So are the future Grandma and Grandpa.

Well…I’m guessing this will just about have to wrap it up for this month and I will begin fresh in the new year with looks at the final pieces and lots of new ideas, work, and tips. 
I hope your holiday was beautiful and fulfilling and that your 2014 is an even better year yet!
HAPPY NEW YEAR
With Love,
Sharon

Tuesday, November 26, 2013

Interesting Art

Have you seen this Facebook page?  It's just fascinating.  It's called Simply Eyes. Go and look.  You'll just love it.


Sunday, November 24, 2013

On the Bench Today...

Winter has hit - boo hoo.  But it is a great time to work and not feel bad about being at the bench.  I've decided that I ought to start a segment on this blog called, "On the Bench Today".  It would be good to show everyone at least once a month what the heck is sitting there...even if I'm in the middle of the process.  If you have any questions about things please don't be afraid to ask.

I'm getting parts ready to add to a necklace I'm working on...hence the flat rings and the end caps.  The filigree I have cut up is destined for a ring or brooch.

 
A larger view of the bench area.  Above the other goodies I've already described I've a pendant in progress and who knows what else.  I'm always knee deep in things I'm working on....it's a curse (or maybe a blessing) to have so many ideas and only two arms to work with.
 
So what's on your bench today?
Come on - We want to see what you're working on too!


Friday, November 1, 2013

Cab Sandwich Update...

From the back - the plate placement.  The rivets are soldered to the front plate and will be riveted in the back plate. I still need to cut tubing to fit the rivets.  They will hold the space steady between the front and the back.

The front of the cab sandwich.  Note the pins are this point are about 3 times they length they need to be and the bezel needs to be cleaned up so it will fit the cab a little better.  When I started it fit - but it doesn't right now....grrrrrr.

 
Here we are all fit together in the stage where I consider what needs to be polished first - what the finish might be (bright/oxidized/ whatever).  I also have dangles that I want to hang on the loose soldered jump ring that is hanging from one of the bottom rungs.  Hmmmmm - what to put there?  I've got to figure out what goes with that heart.  Hearts and flowers? Lost love?  Circus love (I mean it is a triadic color scheme and almost straight red, yellow, blue), so what to do - yikes.

Thursday, October 31, 2013

Wednesday, October 30, 2013

Cab Sandwich

Working today on soldering.  I'd like to get this metal sandwich ready to rivet and bezel.  I took a quick snap of the soldering area because I wanted to show you something.  I've been asked questions before about some of the things I use so a picture is worth a thousand words sometimes.
It's barely noticeable at the moment but in the center of the back plate for the sandwich is my personal stamp from Infinitystamps.com.   It says ArtWerks.  After everything is all oxidized it will show up perfectly.
I put my flux into an applicator with a needle top so I don't waste it.  They're about eight dollars at Rio Grande Jewelry Supply and worth their weight in gold as dispensers.  Since I like putting the old boric acid/denatured alcohol on everything before I flux  keep that mixture in the pink plastic screw top from the personal products area in a Walmart. 

What I really wanted to show you are the tiny hard plastic screw jars (a dollar each from a Meijer's here in Michigan).  When I'm cutting up solder I put the extra pallions in a jar marked with the type.  I always cut more than I think I'll need - you never know when something will go astray and you need to pick solder a piece off your pad to use.  They just plan come in handy. 

 
Also, you can see the usual - copper tongs for pickle/ pickle pot/ and so on. 

Any questions?  You always know I'm delighted to answer.

And for today's cuteness - here is what is keeping me from posting as much as normal - they're always so cute when they're asleep!

 
Daisy Mae Belle and her older and wiser Auntie - Gertrude Jean (affectionately known as Trudy)


Friday, October 25, 2013

Cravings....

I like pie but I love a good cake - fresh and moist and decorated to the nines....how about one of these for the season -


I'm not sure I could eat this one with the spiders - Ooooooo

 
And bringing up the cuteness factor and fairly easy to make would be these.  Just look at the twix for Frankie's ears - love them!


It's not jewelry but it's certainly creative.  Maybe tomorrow...I seriously need some sugar.
 

Wednesday, October 9, 2013

Interim Project with Crystals

In the post called "New Stones" there are 3 fluorite crystals.  At the time I bought them I wasn't exactly sure what I was going to do with them.  They were inexpensive and I liked the graduation of color that fluorite comes in.  What I hadn't checked was that the stone is about a 3 on Mohs scales (hardness) and that crystals can be brittle.  I'm so gun-ho on new pieces that I didn't think about checking that out and began making a cage for them to go along with the design I drew up. 


Turtle be damned I say! So there I was going to my fabrication class with my half done cage and asking questions about what I needed to do to protect these crystals from the heat I was about to apply to ball the second end of these wires.  LOL  That dear sweet teacher looked at me and said "are you trying to turn my hair white?" 

That's when it occurred to me that I should have looked up the necessary information before I designed a cage that required close contact heat.  Okay dokey.  So now what?


Well, like most design issues there is usually a way around the problem.  Mostly if you think about it before the initial design, duh.  Since I also happened to have a jar of Vigor Therm-A-Guard I figured I might find a way around it.  And, so it was.  I wet packed the guard inside the cage and around the crystals, stuffing it in with a soldering pick where I needed to. 

I was just plain lucky - it protected the crystals and I now have a nice cage for them and can continue on with the design.  Back to the torch....I've decided it needs a Warring States themed bead for the bottom - and maybe some matching stone dangles.  It was one of the design options I had come up with.
 
My finished cage needs polishing and oxidization but that can wait until I have more parts complete.
 
It might also look great with a necklace made of similar stones and a ceramic word bead that said "clarity".  Or something to go along with the metaphysical meaning of the fluorite crystals/ and Warring States bead yet to be made.  Choices - choices. 
 
I'm always open to ideas - what do you think?


Friday, October 4, 2013

More Progress on the Pendants


Sharon the turtle here...slowly working through these projects and going to the local gem show tomorrow.  The bullet cab piece is very nearly finished.  I might just set the stones, polish, and add a half-hitch leather to the top - or might add some half round jump rings I can string with leather or chain.  The other piece is slowly taking shape too.  Hopefully by this weekend I will have added several more of the parts.  I've a new project in mind too but I'm trying really hard not to get to far ahead of myself.  I have such a problem with UFO's (unfinished objects).  They fill drawers around here.  That's a whole 'nother psychiatric conversation - I'm sure of it.  LOL

 
Tah Tah for now !

Thursday, September 26, 2013

New Stones

As happenstance would have it there is a store that's "new to me" in Traverse City.  It's in the same area that the old Osiris Bead Shop used to be in.  What a wonderful store that was!  The new find for me is a jewelry and stone store called On the Rocks


Since DH had a medical appointment in TC we went early and walked around downtown.  My plan was to investigate the rock store further and to go to Horizon Books - which always has a decent selection of the current magazines. 

I did find some stones to purchase, not the selection they had at the beginning of the summer for sure, but some interesting pieces.  And while I was looking at the wildly wonderful set cabs (there must have been a thousand) and feeling a melt down at the beautiful selection of stones this artist was using a bell went off in my head.  At the check out counter I picked up her card and noted her name (Kathryn Wilson) and began to read her story as things were being rung up...duh, yup - whoop whoop - the beautiful jewelry with the fantastic cabs.  Uh huh, her husband is Gary Wilson.  He's just about my favorite stone cutter ever.  I knew he lived in TC and in Arizona part of the year but holy crap.


How wonderful for all of us.  Maybe they'll start carrying a larger selection of his stones - that would heaven.  A whole lot easier than trying to elbow your way into the tables at Bead and Button.

I picked up a few of the pieces that were there - an odd lot for sure.  There were these stones I had seen before - called TV Stone.  It is Ulexite.  See how you can see the writing magnified through it?  I thought it might be fun to a fix something underneath it before it's set.  The Labradorite is a huge piece - rock size.  Maybe I could figure out an odd setting and turn it into a talisman kind of necklace with lots of runes and goodies.  Then the Fluorite crystals I thought might be interested set into a cage.  Fun stuff...stones and shopping.

Tuesday, September 24, 2013

Progress on the jewelry

Slow and steady...it tends to be my work pattern as of late.  No complaining but fast and furious wouldn't be bad either.

I made my decisions on the glass cab to put with the stone and had plenty of extras.  After that I decided it would be good to practice to set the extra glass cabochon for practice.  I made the bezel and soldered the silver to the top.

This is another style of cabochon (called a bullet cab) you can make in glass - you can get them in stone, but it's more fun and you can make more designs in glass.

Onward to sawing the top, adding a jump ring and bail, and let's not forget the polishing.  It's still looking pretty raw here.

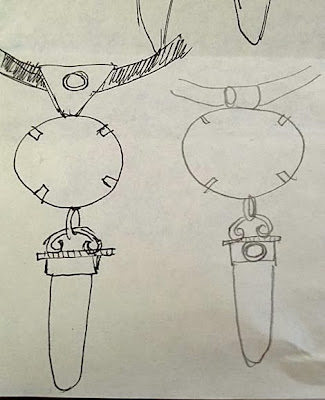
The more complicated piece went through a decision making process for the bail.  It's drawn on the paper that's to the right of the piece.  I'm adding (universe willing) a swiveling bail to the top.  It should be big enough to accommodate a large rubber cord.  See the silver piece above the stone with the prongs - that will be the internal part of the bail.  Below is a glass tongue shaped cab I'm going to hang from the bottom (see the drawing in the previous post). 

 
In a day or two I ought to have the tongue cab capped and ready to go.  I still have to lap sand the top of it so it's nice and flat and do a heck of a lot of forming and soldering.
 
I will post any progress.  
 

Sunday, September 22, 2013

Loosening up some skills.

Whenever I lay off of metal work for awhile I have to warm up with a project.  It is a lot like riding a bike - it comes back.  The bitch of it all is that you are working on something while you are warming up and you aren't pedaling as fast as you did and the handle bars wobble and sometimes the wheel wants to fall off the bike.  I think that covers it. 

So I want to bezel a stone with outside prongs and then go from there.  Here are the drawings that are coming along.  As usual I put my cart before my horse - although that's not unusual when you are just "going for it".  As rough as it is at the moment it will all turn out.

Not exactly an artistic rendering but you get the idea of the possible permutations of this piece.

I did a square wire circle to set the stone on and added prongs (not to worry, they aren't cut to length yet.  I just wanted to get them on).

Not the best pic (not even pickled yet) - but you can see the how it's going to sit on the square wire.

Then I figured I needed a bail - duh, nice thing to think of after I had started but whatever.  See the drawing - plenty can be done here after the fact so it's not so worrisome.  I was considering this thick rubber cord I have so it's going to have to have a healthy opening on it.

All four prongs are on here now.  Now there are choices - lots of choices.  Considering the second one from the left.
 
After I did the initial setting it just seemed plain and I've been working on cabs for the project Susan and I are doing so I figured maybe I needed something hanging from the stone.   I didn't want to try and match up a stone bullet so out came the glass so I could match some colors.   You can create bullet cabs on the end of a mandrel so that is what I did.  I will lap the ends just a bit so they have plenty of surface to grab inside a bezel when it's set.  Primarily I went organic on the design so it would be like the stone but maybe it's too matchy - matchy. 
 
I'll make a few more bullet cabs today before I decide on the final one.  With a heavy silver bail between the two pieces like in the drawing it will break up the match some and then maybe a citrine colored stone on the bezel would help with that too.
 
Choices, choices - good to have them but it always gives me a reason to procrastinate and be slow.
 
Hey, did you see silver is down in price again.....hallelujah!


Thursday, September 19, 2013

It's Already Mid-September - Whoa

So where has Sharon been....lots of things have been happening here as of late.  Sorry for the pause in blogging.

1. Our daughter and her too cute for words husband have moved back to Michigan - YES!  And, we are expecting a grandchild.  Whoo Hoo!  Of course, her father and I are incredibly excited for her and our SIL.  They have waited a very long time....uh, us too.  Our first grandchild is already in high school - our beautiful and smart Adrienne.

2. We have a new addition to our family already.  Meet Daisy Mae Belle - 8 weeks old and just "full of it".  Her name should be "Damn it Daisy - No".  I have told my friends that I have taken on a vampire lover.  I've fang marks everywhere!


This is Daisy with Trudy - poor Trudy has also been bitten by the vampire too.  We're working on it!
 
3. I'm taking a class from one of my favorite teachers - Roger Schmidt.  He's a retired bench jeweler with 25 years experience.  There is nothing, and I mean nothing, this man can't explain or help us with - it's a joy to be back in his class and to visit with old friends.

4. I'm still working on cabs (glass ones to set with stones) - I've decided to set them in as many ways as I can think of so eventually I'll post them as I work on them.

5. I moved equipment around again as we moved some of the things our daughter had stored here down to her new home.  I've been clearing out boxes of jewelry parts and sorting them into those white storage units (they are very nearly full) and moved my little torch up from the basement studio and into a position in the new area where I usually work on finishing.  I figure it only takes up a little space and it would be more convenient than running up and down a flight of steps all the time. 

 
That Ikea table is so steady for a cheap table I can hardly believe it - go Ikea go!
 
That's all the news - it's been a fast and furious couple of weeks.  Oh, and we had a garage sale - and took lots of things to the Goodwill and on and on and on....you know - lots of life stuff (good stuff). 

Friday, August 23, 2013

Cabbing

I've been on kind of mission lately...my friend and cohort Susan Lambert having been discussing getting a new round of classes going again.  We've always enjoyed teaching in tandem and we've designed several classes we taught at Beadfest.  Fun stuff - teaching. 

To that end we are both working on glass cabs that we are going to set.  I love making cabs - well, what the heck - I like glass and metal so it's a natural.


So far these are the cabs I've come up with - more are in the works.  These are made off-mandrel so they can be a variety of sizes.  Not a problem when you can set them or put a glass bail on the top when you make them.  Either works great and looks great.  Most of these are medium sized - I didn't want to go to big since my intention is to add silver but I ought to make some large ones too.  They aren't exactly sitting straight yet since I like to punty a rod to the front and replace the steel chop stick I use on the back with a small glass rod I nip off later after I replace glass on the back taken away by the chop.  It's a process and sounds worse than it is.  I like to touch the back to a flat lap machine anyway so this works best for me.

There are lots of different ways to make cabs.  Off mandrel, on a cab mandrel (Zoozi's carries the old Inspiration ones that are wonderful to work on), and also you can work them on the end of a mandrel coated in mandrel release.  I'm sure there are tons of other ways.  I have some brass tools that are for ring tops but I've never tried them yet. 

Tomorrow I hope to head to the studio and do a few more.  I'd like to have a large selection to choose from before I start setting any and the rest will go on Etsy.   Uh, where to find a place to teach in that can handle both glass and metal - well, that might be an issue.

Onward and upward...

Friday, August 16, 2013

Back to the Torch

New focal bead - based on a pattern I saw by Dawn on LE.  This is a large focal bead and I'm not sure how I managed it in the flame for nearly two hours but did....and on a short mandrel.  Next time I use one of the long ones.  The ochre color doesn't play well with everything so I added turquoise dots and then encased the entire bead in clear so whatever I added to the top wouldn't bleed into it.  Look at how the ochre dots on the red made little halo images.  Interesting.  Glass chemistry is so much fun.

Thursday, August 8, 2013

Still at work on the polymer problem - But, Snippets have arrived..

I told everyone that I was working on a line of 'Snippets" They would be smaller than the found object earrings....which I have always felt needed to look as if they carried with them an important story.  Maybe someone's story about their life, or another's vacation well spent, or of a summer love lost.  They just need to have some heft to hold the story...and be worn by a woman capable of a superb life of her own.  So here I have to show you some earrings that will be posted in MetalWerks for purchase within a day or two.

"Snippets" - My style of earring completed with a snippet of tin and complimentary components culled from around the world.  Just in these earrings there are, brass, vinyl record discs from Africa, Czech glass rounds, faceted murrini roses, shell, mother of pearl, pearls, handmade ceramic dangles, and silver to play off of the non-precious but antique tin. 

There is a photo of a couple of sets of "snippets".  I work in a way that maybe a colorist would find the most comforting.  A decision was made at the beginning to take a tin - scope out what may be an innocuous area in the design - but something that portrayed a nice texture, color, but nothing really discernible.  It had to be little more than a snippet - a tiny piece.  And the tiny piece had to be showing some wear...we people get bumps and scrapes in our lives so let's save shining and perfect for the babies of the world.   Decision number 1.   From there a color palette had to be created around the color of this tin and of whatever bead, wire, fiber, antique hoard I happen to have around.  It's not tough on this account as I have a large collection.  Decision 2 - no major shopping for beads - it had to come out of the hoard - to be released into the world.  These cabinet drawers contained beads that need to have an escape plan and a way of having their 15 minutes of fame.

It's not that "Snippets" don't have stories but I think of them at the beginning of their lives....cute, small, light in weight to cover the dog days of summer into the fall -  more interesting when the tinniest treasures are added to a dangle.  And, with enough of a mix (and the, all important tin) - that the wearer may begin to explain her new earrings in a story of her own, "These are my earrings and they are sooo cool, this is recycled tin, and this bead here is handmade glass - this one comes from the Czech Republic - and this one is an antique."   I want for each customer to have some great times wearing them so their mystique will grow as they are graciously worn throughout the years.

There are other active decisions - wear ability.  Lightly oxidized, patinas, sterling silver for earring wires - keep it simple for the Snippets and let the color and the choice of pieces do the talking.  How wonderful there are beads with iridized coatings and plenty of flash in a little trim of crystals here and there. 
I just think these are so romantic.  They are on the heavy side but not ear ripping heavy.  Ever since my article on earring weights I do quite a bit of switching components in and out to try and get the weight into the "reasonable to wear' state.

These are the first ones I've gotten photos of.  There are three snippets and then a full blown out Story Teller from that collection of earrings.  The token at the bottom of the earring is old, it is from the Honolulu Transit Authority.  It kind of dictated where this earring was going to end....even the color I and pattern I chose for in the tin.  I wanted it to be old - floral - feminine in nature.  It also had to have old fashioned piece on it - such as the dipped facets with the mustard yellow, the amethyst points (faded but still powerful).  The repurposed rhinestone - an area gone by, maybe? A dance on the beach where all she wore were those shimmering stones.  (oh - ooops, maybe a fantasy of mine from a long time ago....LOL).

Well, these will be posted soon - more and better photos will need to be taken and copy written.  I've another half a dozen pairs of various sizes sitting around waiting for their "magical moment" when I dig down into a drawer and find just the right beads to finish the job.  I know I will.

Woot woot - I love making jewelry.

Monday, August 5, 2013

Epic Failure

Oh for Pete's sake!  I just did some Fimo in the toaster oven to make the Hugs and Kisses stamps that I use on the back of my glass heart beads.  They worked perfectly so I guess I got cocky and thought I'd try some other bits and pieces.  I noticed that the temp recommendations were different on the Sculpty than the Fimo but I thought, Well, what the heck.  I'll go slow and find a temp that's in the middle - I mean it's only like ten degrees - right? 

Well, I don't know what the heck happened.  I ran the toaster for fifteen minutes - thinking it's run it a second time for the second fifteen.  Uh, colossal failure.   Look at what I found after the first run.  OMG - what happened? 

Any of you polymer people have any ideas?  It even bubbled.....whoa.

Saturday, August 3, 2013

I've got a frickin' hole in my head, er - paddle.

Yes, you guys are right - and thanks so much for the comments.  I've always been a firm believer in the right tool for the right job.  You really can't make these paddles without all of that wood working equipment.  And, yup, it's like anything...if you have the experience in the craft then you can make the difficult easier.  And working with woods for over 30 years qualifies as that for sure.  Let alone a studio full of woodworking equipment.

Sometimes I see teachers who try to instruct their students with shoddy equipment and it makes me crazy.  If they're new to whatever the craft is you can just see the frustration written all over their faces.  Basically, they're not only fighting to learn the process but they're fighting the equipment right along with it.   It's an insanity.  One class I used to attend for fun I watched a very decent metalsmithing teacher telling her students how easy it was to solder with a plumbers torch.  Uh, sure - maybe for an experienced artist who solders a lot it might be.  And certainly it wouldn't be used for a delicate seam or something with multiple soldering jobs but the poor students were trying to do just that and they were ready to give up on making jewelry.  Not fair.  If she'd of just explained the limitations of working with that type of torch - or maybe added a butane or duel fuel torch so they could see and try the difference but she wasn't about to do that.  Like I said - an insanity - - - - almost like withholding information so you can cripple your possible competition.  So not nice.

I digress - sorry about the tangent. 

Here's the next steps on the Viking Knit paddles...holes, holes, holes.  LOL.  As you can see from the photos there are eight of them and each hole is new set up with the press...not hard, more like time consuming.  After this I will side sand the paddles (you turn the band saw into a tall sander by replacing the blade with a 1"X 80" sanding belt).  After that - rout them and flat sand them - then change the drill press into a flap sander so you can go around what was routed in the grip and make sure it's "soft" edged for the handle.


"I follow you out to the studio and then I wait - can we go yet, can we go yet?  Hello....."

Yeah, I know lots of steps but so worth the process.  Thanks Maple Girl (Andrea) - I'm glad you like yours.  So many teachers use them - Diane Cook at Art Unraveled and Diana Frey.  Robin Koza down in Indiana - and Cahootz (who sells great Viking Knit caps).  I'm grateful so many artists like them too.